The basic of nodes
Nodes are one of the building blocks of any Netbeans RCP application. Since I'm still learning the Netbeans RCP basics I decided to write down what I have understood of nodes so far. So this is my personal notes about nodes as a small tutorial.
The first thing to understand about nodes is that they don't represent the data. Nodes are just a bunch of objects that shows a graphical representation of the data. They contains all the data needed to display themselves but thats all.

This screenshot shows a view of some nodes I have created. It's possible to edit all the data visible and the changes of the data will be reflected immediately in our data objects and there isn't much code we have to write to achive this.
The easiest way to see this is by diving into some code. Lets say that we have an application that shows us all our customers. The basic of the customer class looks like this:
public class Customer {

    private String name;
    private Type type;
    private Boolean contacted;
}
Type is a simple Enum that can be added in the class.
public enum Type{
    small,
    medium,
    big;
}
You will see later why I have choosen to have an enum as one of the properties of the Customer class.
The class also has a constructor and getters and setters. It's very easy to have Netbeans auto create this code for us. Just place the cursor inside the class after the field and press ctrl+i. In the popup menu select Constructor and choose that you want to initialize all the three fields. Then hit ctrl+i again and choose getters and setters and select all fields. This is a very easy way to quickly build up small classes.
So now we have our class. How can we create the Nodes? The easiest way to handle Nodes and the data behind them (remember.. Nodes is only the visual layer) is to use a BeanNode. And to use a BeanNode our class needs to be a Bean. Sound complicated? It isn't. Netbeans will take care of this. Right click on your class and choose BeanInfo editor. It will now create all the information it needs. Switch to Design view and make sure that all our three fields (or properties as they are called) are green. Toggle them by right click on them. Sometimes you have properties that you still want to have getters and setters on but not to be editable trough Bean properties thats why it's possible to choose here. It's also possible to set read and read/write permissions on each property. But lets leave it at default settings.
Now we need to create our Customers in some way. In a real application it would probably be created from a database, a webservice or anything else but in this test lets create them manually in a CustomerService class.
public class CustomerService {
    static List<Customer> getCustomers(){
        return Arrays.asList(new Customer("Apple";, Customer.Type.big, Boolean.TRUE),new Customer("Microsoft";, Customer.Type.medium, Boolean.FALSE),new Customer("John", Customer.Type.medium, Boolean.TRUE));
    }
}
A small static service that returns an ArrayList with three Customers. Now it's time to create the nodes that will be our visible layer to the customer data!
public class CustomerNode extends BeanNode<Customer>{
    public CustomerNode(Customer bean) throws IntrospectionException{
        super(bean);
        setDisplayName(bean.getName());
    }
}
So this is our CustomerNode. There will be one Node for each customer. The node itself doesn't contain the customer data but as you can see it has a displayName. Other properties it can have is a HTMLDisplayName an icon and some other properties used for the visual presentation that we will not touch for now.
To create a collection of Nodes we will use a ChildFactory which is a class that will take care of mapping our Customer data objects into Nodes. Once again not much code is needed.
public class CustomerNodeFactory extends ChildFactory<Customer>{
    @Override
    protected boolean createKeys(List<Customer> list) {
    list.addAll(CustomerService.getCustomers());
    return true;
}

@Override
protected Node createNodeForKey(Customer key) {
    try {
            return new CustomerNode(key);
        } catch (IntrospectionException ex) {
            return Node.EMPTY;
        }
    }
}
What the code above does is that it will take List that contains Customer. Does that look familar? The list is empty in our case so we just call our CustomerService and retrieves the three customers we created earlier. And then add all those to the list.
So what's up with the createNodeForKey method. It's never called? Well.. we don't call it from our code but Netbeans will call it for each Customer found in the List. And what we do is returning a CustomerNode and that's all. Now we have our Nodes! Now we need to display them and this is done by creating a Topcomponent and follow these steps:
* Right click in the design view and set the Layout to BorderLayout.
* Drag a JScrollPanel on top of the design.
* Switch to source view and create two fields.
private final ExplorerManager em;
private final OutlineView outlineView;
* Modify the TopComponent class so it implements ExplorerManager.Provider and allow Netbeans to create the required methods for you.
* In the auto created getExplorerManager() method return em;
* In the constructor we need to create a view for our nodes and initialize our ExplorerManager.
outlineView = new OutlineView();
this.em = new ExplorerManager();
* Switch back to design view and select customized code on the JscrollPanel and modify the source so it says
jScrollPane1 = outlineView;
Now we are almost done! There is one thing left to do. Let our view to know which nodes it should display. This is done in the ComponentOpened() method.
public void componentOpened() {
    em.setRootContext(new AbstractNode(Children.create(new CustomerNodeFactory(), true)));
    outlineView.setPropertyColumns("name", "Name", "type", "Type","contacted","Contacted");
}
The first line says that we want to create a new Node. This node will be the Root for all other nodes. And then we basically tells it that the children of our RootNode is created by the CustomerNodeFactory class that we created earlier. The second line is a list of properties (the field name they have in the Customer class) and what the column showing this data should be called. So here we can select which of our Customer data that should be visible in the view.
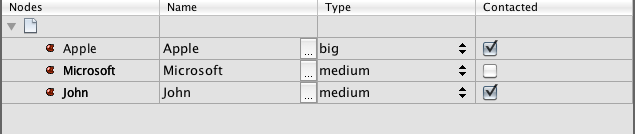
If everyting went well the module should compile now and show you something that looks like this:

As we can see we have our three Customers with the names, they type of the customer and if they have been contacted. Since we used BeanNodes we can click and edit and all our changes will go directly into our Customer without any more coding needed. Netbeans contains some premade editors for the different field. Strings can be edited in place. Enums will be shown as a drop down of all available values of that enum. And booleans has automatically a checkbox.
The beautiful thing here is that we can implement other views displaying the same nodes differently. For example we could show the customers in an icon view. Or just a list without properties. We can even create our own views and display the nodes just as we want.
If you look at the screenshot above you probably are asking two questions. Why is there an empty node with a white icon at the top? Why is the name repeated twice? I will cover that in part 2 of the The basic of nodes.