How to add functionality to NetBeans
This post will be more of a small tutorial walking trough some of the basic NetBeans APIs that make it possible to add new functionality to NetBeans. The goal is to add a toolbar button into the IDE (or any NetBeans RCP based application) that will show you if you have notifications waiting on Facebook. But the steps taken in this tutorial is not limited to Facebook since that is just a small part in total. You can use everything shown here to build something similar like a Twitter button or a Google reader button showing that there are updates waiting.

What APIs and functionality are we gonna cover?
- The module layer file (layer.xml)
- Actions
- Lookup - ServiceProvider creation
- Lookup - Lookup listeners
- Module Installer
- And a little bit of Facebook OAuth and FQL (Facebook Query Language)
Files needed for this tutorial:
RestFB - A minimal Facebook library with zero dependencies
Icons - Six icons in 16,24 and 32 icon size versions. I have used "Newsfeed for Chrome" FB icon as base and added red notifications colors to it in GIMP.
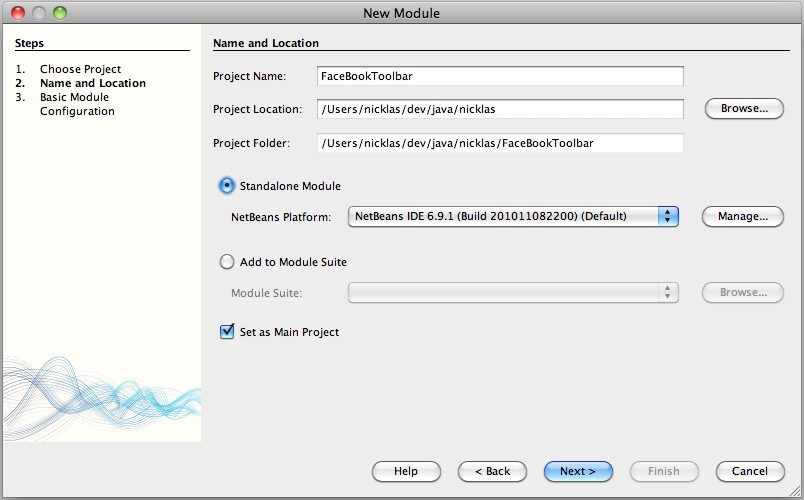
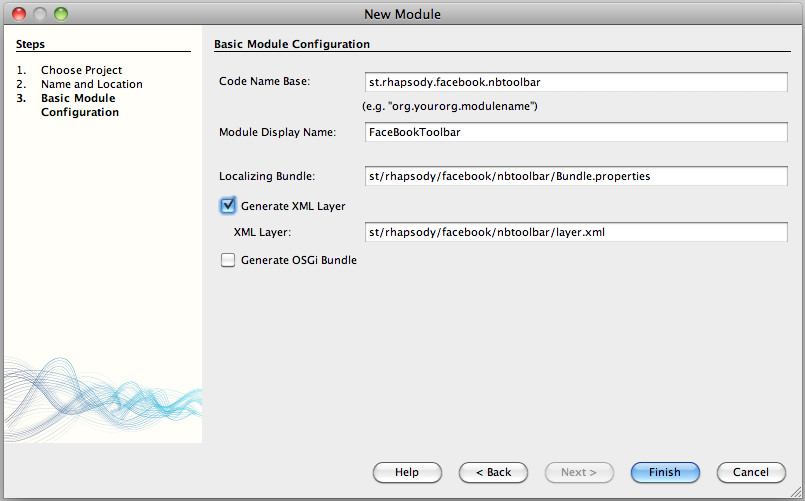
So.. lets get started! First of all we need to create a NetBeans module that can be loaded into the IDE. This is done by creating a new project and select NetBeans Module -> Module. Give it a name and choose that it should be a Standalone module and select the Platform it's gonna be based on (for example NetBeans IDE 6.9.1) which is there by default if you have 6.9.1. Finally give it a code name base (java package path) and a display name. Finally check the Generate XML layer checkbox.


Icons
Before we start enter some code lets copy our resources first which is the icons (link above). In the root package create a new folder and call it resources. Then switch to the file view and select the icons in your operating system file manager (Finder for OSX and Explorer in Windows) and select copy. Then right click the resources folder (when you are in the file view) and select paste and the icons will automatically be copied and included in your project.
Library
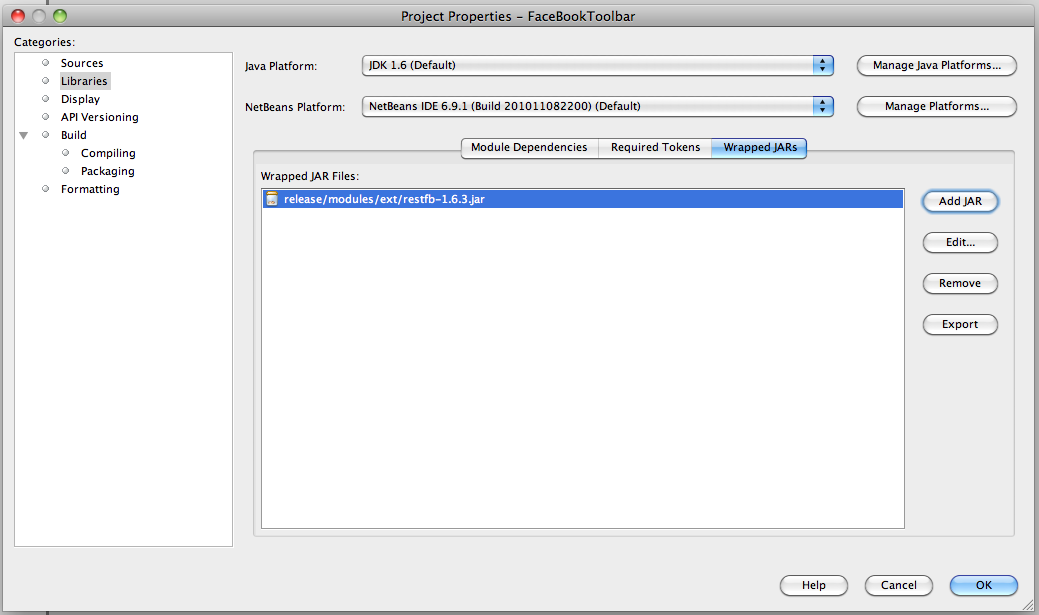
Now we also need to add the restfb library. Usually it's done by creating a separate wrapper module but in this case we gonna add it to this module. Switch back to the projects view and right click on the project and select properties. In the libraries display select Wrapped JARs and click add JAR. Browse to the restfb jar file (link above) and it will now be included and distributed together with our module.

Dependencies
We also need to specify which modules from the Platform that we gonna depend on. This is done in the Library panel in the module project properties. For this module we need to add Actions APIs, Lookup, Module System API, UI Utilities API and Utilities API.
Create an action
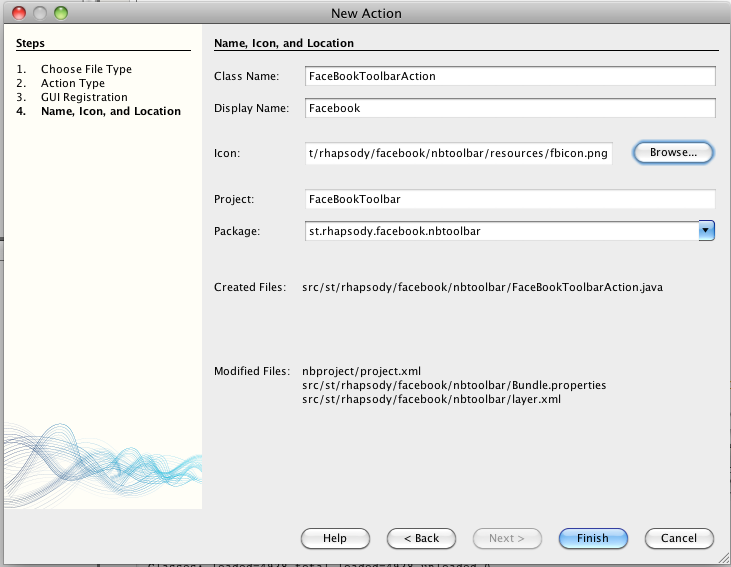
All right.. now we have included the icons and the library we need. Now lets start to generate some code... So how do we get a button in the toolbar? By creating an action which is also done by a wizard. So click new and create a new action. Select the action to be Always enabled. Now we need to decide where our button will be visible. Lets put Internet into the Category and uncheck the Global menu item checkbox since we don't want to have a menu item. Select the global toolbar button checkbox and choose where you want it to be placed. I did choose File and the position to be after the Save all button. Finally give the action a class name and a display name. In this step you also gonna choose the icon for the action. Icons are handled in a clever way in NetBeans as I'm gonna describe a bit further down but to get us started browse to the resource folder and select fbicon.png and none of the other icons.

Now we have our action ready and by default it implements an actionlistener and all registration is done in the layer.xml file. We need our action to do more things than just launch something when clicked so lets start modify what the wizard generated for us. First remove implements actionlistener and replace it with "extends AbstractAction implements LookupListener" and fix imports. The actionPerformend method can also be removed. Now we need to modify the registration in layer.xml. We gonna remove all the <attr….> tags from the file in Actions/Internet but save the iconBase value since we gonna need to add it into our action code.

Now lets add all the code needed for our action to display the Facebook action and react on updates. Replace all methods with these ones:
public final class FaceBookToolbarAction extends AbstractAction implements LookupListener {

    private final Lookup lookup;
    private Result<Boolean> lkpInfo;

    public FaceBookToolbarAction() {
        this(Lookup.getDefault().lookup(FaceBookService.class).getLookup());
        setEnabled(false);
        putValue("iconBase", "st/rhapsody/facebook/nbtoolbar/resources/fbicon.png");
        putValue(Action.NAME, NbBundle.getMessage(FaceBookToolbarAction.class, "CTL_FaceBookToolbarAction"));
    }

    public FaceBookToolbarAction(Lookup lookup) {
        this.lookup = lookup;
        init();
    }

    private void init() {

        if (lkpInfo != null) {
            return;
        }
        lkpInfo = lookup.lookupResult(Boolean.class);
        lkpInfo.addLookupListener(this);
        resultChanged(null);
    }

    @Override
    public void actionPerformed(ActionEvent e) {

        if (Desktop.isDesktopSupported()) {
            try {
                Desktop.getDesktop().browse(new URI("http://www.facebook.com/notifications.php"));
            } catch (URISyntaxException ex) {
                Exceptions.printStackTrace(ex);
            } catch (IOException ex) {
                Exceptions.printStackTrace(ex);
            }
            updateEnableStatus(false);
        }
    }

    @Override
    public void resultChanged(LookupEvent ev) {
        if (lkpInfo.allInstances().size() > 0) {
            for (Boolean notification : lkpInfo.allInstances()) {
                updateEnableStatus(notification);
            }
        }
    }

    private void updateEnableStatus(final boolean enabled) {
        SwingUtilities.invokeLater(new Runnable() {

            @Override
            public void run() {
                setEnabled(enabled);
            }
        });
    }
}
Replace the String in the iconBase setValue with the value from "iconBase" from your layer.xml file and fix all imports. Now there is some errors left which will be solved soon when we implement our facebookservice that will take care of the communication with Facebook.
But lets start by explain what the code in the action does. Lets go trough from top to bottom.
The constructors. The first one is called when NetBeans creates an instance of the action. It will use Lookup to find an instance of FaceBookService.class (that we haven't created yet). From that instance it will get the lookup and put that into the lookup field so we can listen for changes that happens in the FaceBookService implementation. Then we are setting the action to be disabled. And finally we call init() which will check if the Lookupresult from the FaceBookService is already created and skip the rest of the code. If it isn't it will ask the FaceBookService lookup for the lookupresult and tells it that we are only interested in getting updates that are of Booleans. And to the result we are adding a looklistener that will be informed each time a change has occurred in the FaceBookService.
We also put two values into the action. The first one is the base path to the icon and the other one is the name which is picked up from the file Bundle.properties. Why do we pick the name from here? In case your application is shipped in different languages you can provide different translations for Strings which are read from the bundle file instead of being hard coded into the class files.
actionPerformed(). This is the code that gets executed when the user press the button in the toolbar. And what we want done is opening the notifications page at Facebook which is done with the help of the Desktop class in Java6.
resultChanged(). this is where all the magic happens. If our lookupresult.allInstances() (which is a collection) is bigger than 0 means that we have an update to show. As you can see we are getting instances of FaceBookUpdate from the result and we are checking if doesNotificationExist() is true or false. If it's true it means that notifications exists and our action has to be enabled. If it's false it means that no notifications exists and our action has to be disabled. The status is set in the updateEnableStatus() method.
Summary: So in short our action will get enabled when there is Facebook notifications and disabled when there is no Facebook notifications. And it will be notified about these changes from an external service so the action itself doesn't have to execute all the communication code with Facebook.
How NetBeans are handling icons.
NetBeans will show different icons if it's enabled or disabled. But how do we control that from our action? All we did was setting the action enable status. This is the trick. When NetBeans is scanning for the icon (provided by the iconBase) it will also look alternate icons based on the filename. So when it's looking for fbicon.png it will also look for fbicon24.png and fbicon32.png so we can provide different icons for different sizes. It will also look for icon files with _disabled.png in the filename and use that one when our action is disabled. So all you need to do is provide the basename of the icon and NetBeans will automatically handle what is shown. And this is the trick I'm using here. When our action is disabled it just displays a facebook icon.(fbiconXX_disabled.png) When it gets enabled it will display the normal icon showing a little red square to tell us that we have a notification.
Facebook service
Now it's time to implement the service that will actually do the work by updating the status from Facebook. We could add this code into the action but that's not very nice. We gonna do it in a better way. As you can see above we are using Lookup to locate an implementation of FaceBookService.class which is an interface. So lets create that interface by adding a new interface to our project and add the following code:
public interface FaceBookService extends Lookup.Provider {
    @Override
    public Lookup getLookup();
    public void updateNotifications();
}
And then add a normal java class file that will implement this interface:
@ServiceProvider(service = FaceBookService.class)
public class FaceBookServiceImpl implements FaceBookService {

    private final InstanceContent instanceContent;
    private final AbstractLookup abstractLookup;
    private static final String ACCESS_TOKEN = "YOUR FACEBOOK ACCESS TOKEN";

    public FaceBookServiceImpl() {
        instanceContent = new InstanceContent();
        abstractLookup = new AbstractLookup(instanceContent);
    }

    @Override
    public Lookup getLookup() {
        return abstractLookup;
    }

    @Override
    public void updateNotifications() {
        FacebookClient facebookClient = new DefaultFacebookClient(ACCESS_TOKEN);
        String query = "SELECT notification_id, href, title_text, app_id, created_time, is_unread FROM notification WHERE recipient_id=me() AND is_unread = 1";
        List<FqlNotification> notifications = facebookClient.executeQuery(query, FqlNotification.class);
        if (notifications.isEmpty()) {
            instanceContent.set(Arrays.asList(Boolean.valueOf("False")), null);
        }else{
            instanceContent.set(Arrays.asList(Boolean.valueOf("True")), null);
        }
    }

    public static class FqlNotification {

        @Facebook
        String notification_id;
        @Facebook
        String href;
        @Facebook
        String title_text;
        @Facebook
        String app_id;
        @Facebook
        String created_time;
        @Facebook
        String is_unread;

        @Override
        public String toString() {
            return "FqlNotification{" + "notification_id=" + notification_id + "href=" + href + "title_text=" + title_text + "app_id=" + app_id + "created_time=" + created_time + "is_unread=" + is_unread + '}';
        }
    }
}
Lets go trough the class:
@ServiceProvider This was one of the news in NetBeans 6.9. Earlier you had to do this by editing external files but can now be done by this simple annotation. It tells NetBeans that this class is handled by NetBeans Lookup and a new instance will be created when it's first called. In our case the init() method in the actions that asks the Lookup for an instance.
The two fields and getLookup(). These are used to help us to implement a Lookup that other classes can connect to and we can communicate with them from our class. We don't even have to know who is interested in our lookup as you can see we just provide a getter for the Lookup. (And don't confuse this Lookup with the ServiceProvider lookup.)
updateNotifications().This is where we connect to Facebook and checks for updates. We are creating a new instance of the RestFB client and use something called Facebook Query Language which is like SQL but used to query the Facebook API service for information. In our case we are asking for unread notifications. If there are notifications we will create a new instance of Boolean with True and if no notifications exists we will create an a Boolean with false. Everyone that is looking for changes in our lookup will now receive a boolean in the lookupresult.
ACCESS_TOKEN. This is explained a bit further down.
Schedule the service to update frequently
Now there is one last thing to do. To execute our service frequently. The easiest way to do this is to add a hook into the NetBeans lifecycle manager and make sure that our facebookservice gets executed once every minute. Right click the module and create "Installer/Activator". Here we can control what is happening when our module is loaded. In general modules shouldnt use the installer method because if every module is executing code on NetBeans startup the time it takes to start NetBeans will take more and more time but we will use it anyway in this example ;-)
public class Installer extends ModuleInstall {

    private ScheduledFuture<?> scheduleWithFixedDelay;
    @Override
    public void restored() {
         scheduleWithFixedDelay = Executors.newScheduledThreadPool(1).scheduleWithFixedDelay(new Runnable() {

            @Override
            public void run() {
                Lookup.getDefault().lookup(FaceBookService.class).updateNotifications();
            }
        }, 60, 60, TimeUnit.SECONDS);
    }
}
All we do here is creating a new runnable that will make sure that the updateNotifications() method is called once every minute with an initial delay of one minute.
Facebook Oauth
And we are done! All that is left to do is connect to facebook and authenticate. Facebook is using something called Oauth2 which means that you will receive an access token that gives a certain application access to use your Facebook account. The instructions below are copied from the RestFB web page and in the end you will have an access token that you can paste into the ACCESS_TOKEN constant in FaceBookServiceImpl. It looks like this: 123|123abc123-123|aBC1 (but much longer). As you have noticed we are hard coding the ACCESS_TOKEN into our module which isn't good! In my followup to this post I will show how easy it's to save preferences with NetBeans so the token key can be entered once into the application and then saved. The instructions below can be found at http://restfb.com/
In order to use these, you'll need to create a Facebook Application and then request an OAuth access token with the proper permissions, e.g. publish_stream,offline_access,create_event.
The Facebook Graph API authorization documentation explains how to do this in detail.
If you're in a hurry, though, here's a quick example:
Create a Facebook Application
Request https://graph.facebook.com/oauth/authorize?client_id=MY_API_KEY& redirect_uri=http://www.facebook.com/connect/login_success.html& scope=publish_stream,offline_access,create_event
Facebook will redirect you to http://www.facebook.com/connect/login_success.html? code=MY_VERIFICATION_CODE
Request https://graph.facebook.com/oauth/access_token?client_id=MY_API_KEY& redirect_uri=http://www.facebook.com/connect/login_success.html& client_secret=MY_APP_SECRET&code=MY_VERIFICATION_CODE
Facebook will respond with access_token=MY_ACCESS_TOKEN
And with all this in place this is how my toolbar looks like:

I will do two follow ups to this post where I will show how to:
- Make the ACCESS_TOKEN be saved together with the application instead of hard code it into the class file.
- How to extend so we have a basic internetservice module where we can plugin services (as separate NetBeans modules) that we want to receive notifications from in our toolbar. For example 3 toolbar icons with Facebook, Twitter and Google reader.
Install the module into the NetBeans IDE
One last thing. To install this module into your IDE, right click on the module and select Create NBM. In the output window you will see the path to st-rhapsody-facebook-nbtoolbar.nbm. Open the plugin window in NetBeans and select the Downloaded tab, browse to the .nbm file you just created and install it. After the installation is done you will directly see the icon in the toolbar (if you haven't choosen to hide the File toolbar offcourse) without even have to restart NetBeans.